
Vilros made a case for the Raspberry Pi that includes a Wireless Keyboard, which sort of turns the Raspberry Pi 4 into a facsimile of an old 8-bit home computer, like a Commodore 64 or Atari 800XL. It's a pretty cute case, but I immediately saw the potential for improving it. I got a slightly-used one for $25 on ebay, and sort of felt that the keyboard was actually crappier than the standard Raspberry Pi flat keyboards in use. The implementation of Vilros's design was really poor, having way too many screws, and a method of turning on the keyboard and changing its batteries that just seemed to be too inconvenient for users to actually put up with.
My idea was to simply change the keyboard out with a wired mechanical keyboard, which was an improvement in and of itself, and since it was wired, we didn't have to worry about the complicated battery-replacement scheme that Vilros made. Plus, it's a mechanical keyboard, which is actually better looking as well as better performing.
 So, this is the product. For all intents and purposes, it just looks like another keyboard with a trackpad, like my Logitech one in the background. What I found was that the keyboard was an already-existing Vilros product, and they just made the Raspberry Pi-4 case to house it. The fact that it was an after-thought really shows.
 Here is the Raspberry Pi official keyboard for comparison. If the Raspberry Pi keyboard had a trackpad it would be the same size all around.
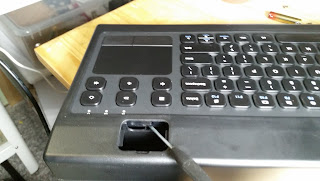
 So, here are the two examples of poor design in this keyboard/case. First, to turn the keyboard on and off, you have to remove a little door from the top of the case, and stick a long instrument into it to slide the on/off switch. Sort of lazy, if you ask me. They didn't redesign the keyboard; they just made it difficult to turn it on. Changing the batteries is even worse, You have to remove the Raspberry pi and the panel that it's screwed to, then you have to struggle to get the battery cover off of the bottom of the keyboard. The cover on mine was kind of loose, so it didn't want to stay closed. But since I'm not using it, no problem. By the way, I gave the keyboard to my girlfriend for her computer, and she rejected it after just an hour of using it. It's a truly awful kayboard in general.
 So the Raspberry Pi fits on a small plastic base that is held on by no less than 6 screws. But wait -- you can't remove it without removing several screws that hold the case together. Yeah -- the top and bottom part of the case have several over-laps that sandwich the Raspberry Pi holder. So you basically need to remove all 12 screws from the whole case. Nothing is easy on this piece of crap.
 So the replacement keyboard I chose was a Red Dragon USB keyboard. It has RGB, but it's actually cheaper than similar keyboards without RGB. Go Figure. It has real Cherry-style switches, and several light-up modes.
Getting the keyboard to fit in the case was easy. All I needed was a place for the keyboard to rest that didn't interfere with how it was screwed together. I had some circuit board mounting posts left over from another project (Yeah, they're like $5 for a bag of 50!), and what I did was remove the keyboard from it's plastic case. It was connected with 8 small screws. I connected the keyboard to the posts, using the screws that came with the posts, and then test-fit it. The top of the keyboard needed to be raised, because of the slant of the case. This was easily resolved by putting small wooden risers made from shims that you get at a hardware store.


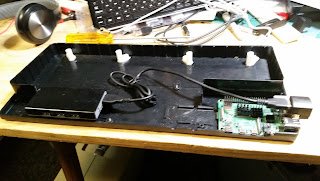 So I decided to add a USB 3.0 Hub to make this a raspberry Pi that had a little extra Oomph. Since the Vilros case has the Raspberry Pi sitting in the rear corner, with the ports all facing outside, I realized i had to do one of two things -- find a USB 3.0 GPIO board (not possible because nothing will fit on the GPIO; the top of the case would no longer fit), or use a 180-degree usb plug, like the Argon one case with the M.2 support does. I decided on the 180-degree plug. They are available on Amazon and elsewhere, and apparently, they've gotten thinner and smaller.
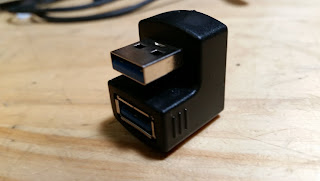
 Here you can see the 180-degree USB plug. The second picture is the cut I had to make around the plastic case top so that I could fit it in. I connect the USB hub to the plug, and the keyboard and future USB hard drive will get connected internally.
 I decided to go with a Raspberry Pi with 8GB. This computer was going to be used for Linux and emulation, so I wanted great performance. Having used the 8GB model for a while now, it really handles other distributions of Linux rather well, and I've been using it as my bench computer. Based on a tip about the powered USB hub I had and powering the Raspberry Pi with a couple of wires on the GPIO, I decided to go that route. The USB Hub would provide the power to the Raspberry Pi, so instead of plugging in the USB-C cable, I'd just plug in the hub, using it's more powerful power supply, and run a USB cable to the GPIO, which would be cut and fited with the appropriate jumpers. I was even able to attach 2 small fans that fit in the case gaps perfectly.

The red plastic border around the case was a baffle I made to just hide the insides of the case from being seen through the cracks. The keyboard left a big gap on one side, and you could see wires and things under the space bar, so I added the plastic border to hide it all.

So this is the finished product. Of course, no sooner than I finished it than I decided I wanted to add more stuff to it and do things differently. I want to add an internal M.2 drive, but I also want to change video output to full-size HDMI. The micro-hdmi connection is utterly the worst, whether you're on a Raspberry Pi 4 or anything else that uses one. I want to find a new way of hooking everything up, so I can glue the micro-HDMI cable in place, to prevent it from being moved, and have the full-size HDMI port on the back.
It's going to take work to get that done -- I practically have to re-do everything.
